In this tutorial, we will create a Spring Boot application which demonstrates how we can add and use the H2 in-memory database in our application. You will learn how an in-memory database like H2 can be used to develop a Spring boot application without the overhead of doing DB configuration on your machine and without specifying any config details in the app.
Note: If your project uses Spring Security, read the following tutorial, Add H2 Database to Spring Boot Project with Spring Security.
H2 database
The H2 database is an open-source database written in Java programming language, which supports querying data in standard SQL. It is very lightweight, and its JAR file is only 1.5MB in size.
Although H2 is an in-memory database, it means that data will be wiped out of the memory as soon as the application is stopped. H2 is a pretty fast database and can be used for many purposes:
- A quick POC (Proof of Concept) where you don’t want to invest time in setting up a database and constructing a schema for the app,
- You want to use temporary data instead of actual data in your DB for running JUnit test cases.
For use cases like the above, in-memory databases are quite evident in usage due to their quick setup and minimal configuration needed on the application side. In this lesson, we will see what we can do with an in-memory database when integrated with a Spring Boot application.
Setting up the project
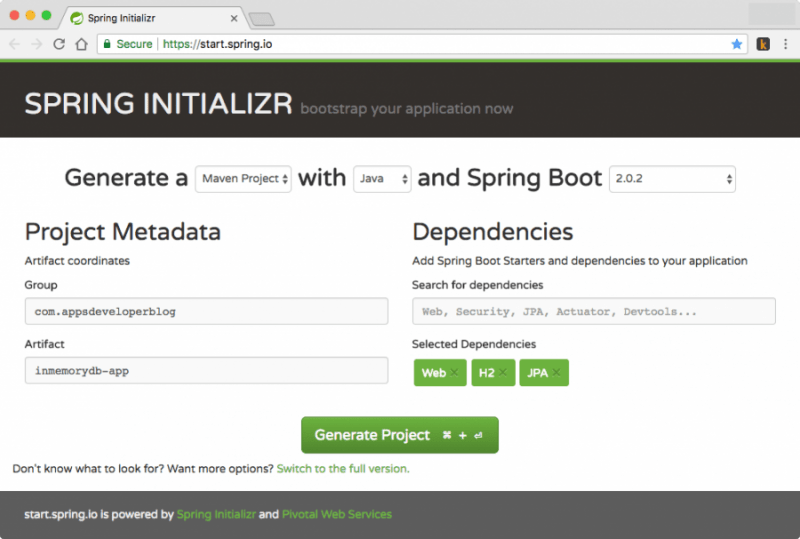
To quickly set up our project, we will use a tool called Spring Initializr. Using this tool, we can quickly provide a list of Dependencies we need and download the bootstrapped application:

When creating a new project with the Spring Initializr, we used the following dependencies:
- Spring Boot Starter Web
- H2 Database
- JPA Dependency
Though this tool helps us to add the above dependencies, below is the source code of pom.xml file from which you can copy these dependencies and add them to your project manually.
Maven Dependencies
Use any IDE to open the downloaded Maven-based project. To implement our project with Spring Boot and use H2 as our in-memory database, we will use Maven to manage dependencies. Below are the dependencies we will need for now:
<parent>
  <groupId>org.springframework.boot</groupId>
  <artifactId>spring-boot-starter-parent</artifactId>
  <version>2.0.2.RELEASE</version>
  <relativePath/> <!-- lookup parent from repository -->
</parent>

<properties>
  <project.build.sourceEncoding>UTF-8</project.build.sourceEncoding>
  <project.reporting.outputEncoding>UTF-8</project.reporting.outputEncoding>
  <java.version>1.8</java.version>
</properties>

<dependencies>

  <dependency>
     <groupId>org.springframework.boot</groupId>
     <artifactId>spring-boot-starter-web</artifactId>
  </dependency>

  <dependency>
     <groupId>org.springframework.boot</groupId>
     <artifactId>spring-boot-starter-data-jpa</artifactId>
  </dependency>

  <dependency>
     <groupId>com.h2database</groupId>
     <artifactId>h2</artifactId>
     <scope>runtime</scope>
  </dependency>

  <dependency>
     <groupId>org.springframework.boot</groupId>
     <artifactId>spring-boot-starter-test</artifactId>
     <scope>test</scope>
  </dependency>

</dependencies>

<build>
  <plugins>
     <plugin>
        <groupId>org.springframework.boot</groupId>
        <artifactId>spring-boot-maven-plugin</artifactId>
     </plugin>
  </plugins>
</build>
Project Structure
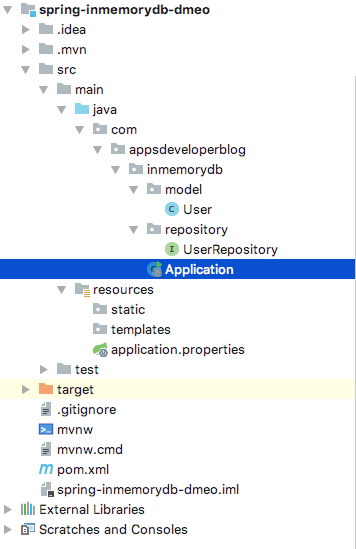
Below is an example of a project structure. The project code is organized into multiple packages so that the principle of separation of concern is followed and the code remains modular.

Database Configuration
The best thing about using an in-memory database is that we don’t have to do any configuration. I am going the following properties to the application.properties file, which is to enable the H2 console:
# Enabling H2 Console
spring.h2.console.enabled=true

spring.datasource.url=jdbc:h2:mem:testdb
spring.datasource.driverClassName=org.h2.Driver
spring.jpa.database-platform=org.hibernate.dialect.H2Dialect
This property of Spring Boot enables the Web UI for our in-memory database, which is accessible via the following link:
http://localhost:8080/h2-console
Note that this URL is reachable only when our application is in running mode. We will have a look at this console once we run our project.
Model Class
We will make a simple User entity with some fields with which we will be able to demonstrate simple JPA queries:
package com.appsdeveloperblog.inmemorydb.model;

import javax.persistence.Entity;
import javax.persistence.Id;

@Entity
public class User {

   @Id
   private Long id;
   private String name;
   private int age;

   public User() {
   }

   public User(Long id, String name, int age) {
       this.id = id;
       this.name = name;
       this.age = age;
   }

   //standard setters and getters

   @Override
   public String toString() {
       return "User{" +
               "id=" + id +
               ", name='" + name + '\'' +
               ", age=" + age +
               '}';
   }
}
Defining Data Access Layer interface
To access the database, we will be defining a simple JPA interface which provides its own helper functions, which will be enough to do simple DB operations for this tutorial:
package com.appsdeveloperblog.inmemorydb.repository;

import com.appsdeveloperblog.inmemorydb.model.User;
import org.springframework.data.jpa.repository.JpaRepository;
import org.springframework.stereotype.Repository;

@Repository
public interface UserRepository extends JpaRepository<User, Long> { }
Making a Command Line runner
We will run our application with a command-line runner, calling some of the functions we have from the JPA Repository interface we defined. Here is the Command-line runner:
package com.appsdeveloperblog.inmemorydb;

import com.appsdeveloperblog.inmemorydb.model.User;
import com.appsdeveloperblog.inmemorydb.repository.UserRepository;
import org.slf4j.Logger;
import org.slf4j.LoggerFactory;
import org.springframework.beans.factory.annotation.Autowired;
import org.springframework.boot.CommandLineRunner;
import org.springframework.boot.SpringApplication;
import org.springframework.boot.autoconfigure.SpringBootApplication;

@SpringBootApplication
public class Application implements CommandLineRunner {

  private Logger LOG = LoggerFactory.getLogger("Application");

  private final UserRepository userRepository;

  @Autowired
  public Application(UserRepository userRepository) {
     this.userRepository = userRepository;
  }

  public static void main(String[] args) {
     SpringApplication.run(Application.class, args);
  }

  @Override
  public void run(String... args) throws Exception {
     User user1 = new User(1L, "Sergey", 24);
     User user2 = new User(2L, "Ivan", 26);
     User user3 = new User(3L, "Adam", 31);

     LOG.info("Inserting data in DB.");
     userRepository.save(user1);
     userRepository.save(user2);
     userRepository.save(user3);

     LOG.info("User count in DB: {}", userRepository.count());
     LOG.info("User with ID 1: {}", userRepository.findById(1L));
     LOG.info("Deleting user with ID 2L form DB.");
     userRepository.deleteById(2L);
     LOG.info("User count in DB: {}", userRepository.count());
  }
}
Now, we should be able to run our application using a simple command:
mvn spring-boot:run
Once we run the application, we will be able to see a simple output in our terminal:

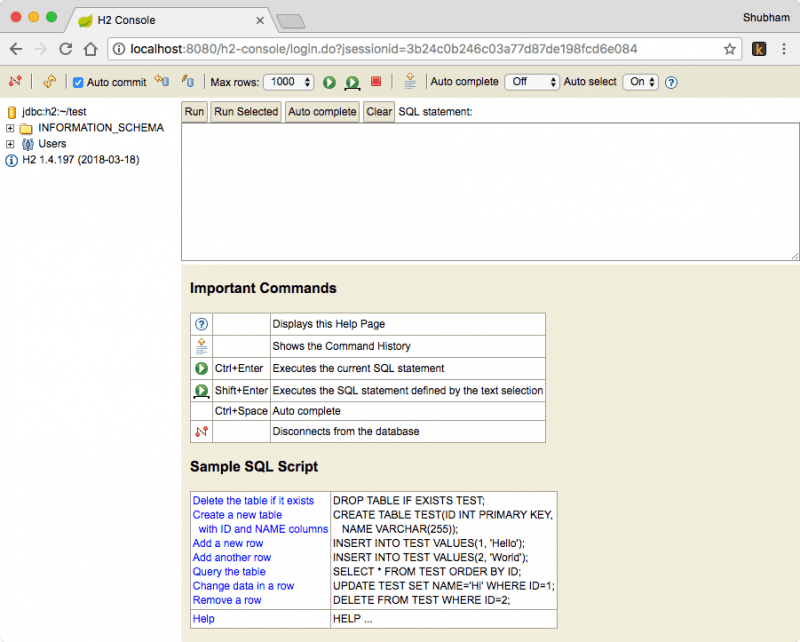
Do not stop the application just now. Try to access the H2 console now on the URL we mentioned above, and you will see something like this:

Note that the above UI console is accessible only when this application runs. Also, this console won’t be reachable after the application has stopped.
How does it work?
The first question that comes to mind when we run this application is how is Spring able to configure and run the H2 database? This is because of the pre-configured Spring Boot nature, which detects the presence of H2 database dependency in the classpath and does most of the work for us. The only configuration we need to do is to add the correct dependency and enable the web console for the database in the application properties file.
Spring Boot also understands that as the H2 database is an in-memory database, it doesn’t even ask you to set up a user or a database name. Had you used the MySQL DB in place of this, Spring Boot would complain and ask you to do complete configuration as MySQL is a disk-persistence DB which is permanent in nature.
Conclusion
In this lesson, we looked at how an in-memory database like H2 can be used to develop a Spring boot application without the overhead of doing DB configuration on your machine and without specifying any config details in the app. This means we can dive into our POC or small project logic straightaway without deciding what database we should use.
Although H2 is an in-memory database, it can be run in a persistence mode where it persists data across application restart. While this is not recommended, as the H2 database is not made for that purpose.
If you are interested in learning more about building RESTful Web services with Spring Boot and Spring MVC, look at my step-by-step video courses. You might love learning programming by watching videos and speeding up your learning progress.