In this tutorial, you will learn how to create a Web Service or a Microservice and how to make it register with Eureka Discovery Server.
For a step-by-step series of video lessons, please check this page: Spring Boot Microservices and Spring Cloud.
Start Eureka Discovery Server
To be able to follow this tutorial, you will need to have your Eureka Discovery Server running. If you do not have Eureka Server running, then please follow this tutorial to learn how to create and start a new Eureka Discovery Server.
Create a New Microservice with Spring Boot
We can register our Web Services now that we have our Eureka Discovery Server. If you do not have a Web Service created, follow this tutorial to learn how to create a new Web Service with Spring Boot.
Add Spring Cloud Dependencies
For us to be able to register a new Spring Boot Web Service with Eureka Discovery Server, we will need to add Spring Cloud dependencies to the POM.xml file of our Web Service project. So open the POM.xml file of your Spring Boot Web Service and add the following information.
Update <properties> Section
Add the Spring Cloud version to your <properties> section.
<properties>
    <java.version>1.8</java.version>
    <spring-cloud.version>Greenwich.RC2</spring-cloud.version>
</properties>
Update <dependencies> section
Add the Spring Cloud Starter Netflix Eureka Client dependency to a <dependencies> section.
<dependency>
    <groupId>org.springframework.cloud</groupId>
    <artifactId>spring-cloud-starter-netflix-eureka-client</artifactId>
</dependency>
Add the Dependency Management section
Add <dependencyManagement> section to your POM.xml file.
<dependencyManagement>
      <dependencies>
          <dependency>
              <groupId>org.springframework.cloud</groupId>
              <artifactId>spring-cloud-dependencies</artifactId>
              <version>${spring-cloud.version}</version>
              <type>pom</type>
              <scope>import</scope>
          </dependency>
      </dependencies>
  </dependencyManagement>
Below is a complete POM.xml file of my Spring Boot Web Service project.
<?xml version="1.0" encoding="UTF-8"?>
<project xmlns="http://maven.apache.org/POM/4.0.0" xmlns:xsi="http://www.w3.org/2001/XMLSchema-instance"
         xsi:schemaLocation="http://maven.apache.org/POM/4.0.0 http://maven.apache.org/xsd/maven-4.0.0.xsd">
    <modelVersion>4.0.0</modelVersion>
    <parent>
        <groupId>org.springframework.boot</groupId>
        <artifactId>spring-boot-starter-parent</artifactId>
        <version>2.1.1.RELEASE</version>
        <relativePath/> <!-- lookup parent from repository -->
    </parent>
    <groupId>com.appsdeveloperblog.photoapp.api.users</groupId>
    <artifactId>PhotoAppApiUsers</artifactId>
    <version>0.0.1-SNAPSHOT</version>
    <name>PhotoAppApiUsers</name>
    <description>Demo project for Spring Boot</description>

    <properties>
        <java.version>1.8</java.version>
        <spring-cloud.version>Greenwich.RC2</spring-cloud.version>
    </properties>

    <dependencies>
        <dependency>
            <groupId>org.springframework.boot</groupId>
            <artifactId>spring-boot-starter-web</artifactId>
        </dependency>

        <dependency>
            <groupId>org.springframework.cloud</groupId>
            <artifactId>spring-cloud-starter-netflix-eureka-client</artifactId>
        </dependency>

        <dependency>
            <groupId>org.springframework.boot</groupId>
            <artifactId>spring-boot-starter-test</artifactId>
            <scope>test</scope>
        </dependency>

    </dependencies>


  <dependencyManagement>
        <dependencies>
            <dependency>
                <groupId>org.springframework.cloud</groupId>
                <artifactId>spring-cloud-dependencies</artifactId>
                <version>${spring-cloud.version}</version>
                <type>pom</type>
                <scope>import</scope>
            </dependency>
        </dependencies>
    </dependencyManagement>

    <build>
        <plugins>
            <plugin>
                <groupId>org.springframework.boot</groupId>
                <artifactId>spring-boot-maven-plugin</artifactId>
            </plugin>
        </plugins>
    </build>

</project>
Update application.properties File
Now that we have Spring Cloud Dependencies added, we can update the application.properties file with the needed configuration to enable our Spring Boot Web Service to register with Eureka Discovery Server.
eureka.client.serviceUrl.defaultZone = http://localhost:8010/eureka
server.port=0
spring.application.name=PhotoAppApi-Users
- eureka.client.serviceUrl.defaultZone – is needed to provide the location of our Eureka Discovery Server. The Eureka server must be running other wise our web service will not be able to register with it.
- server.port – A port number on which this Spring Boot Microservice will run. I have specified zero as port number, so that Spring Framework can assign a randomly generated port number instead.
- spring.application.name – Name of our RESTful Web Service.
There are many more properties that you can configure, but these are the basic ones for you to be able, to begin with.
Add Enable Discovery Client Annotation
We are now ready to enable our Spring Boot Microservice to be enabled as a Client application to register with Eureka Discovery Server. To do that, we need to add the @EnableDiscoveryClient annotation above the Java class, which contains the public static void main(String[] args) function.
Below is an example of my application class with the @EnableDiscoveryClient annotation added.
package com.appsdeveloperblog.photoapp.api.users;

import org.springframework.boot.SpringApplication;
import org.springframework.boot.autoconfigure.SpringBootApplication;
import org.springframework.cloud.client.discovery.EnableDiscoveryClient;

@SpringBootApplication
@EnableDiscoveryClient
public class PhotoAppApiApplication {

 public static void main(String[] args) {
  SpringApplication.run(PhotoAppApiApplication.class, args);
 }

}
Startup Spring Boot Web Service
We are now ready to start our Spring Boot Microservice and make it register with the Eureka Discovery server.
Note: Please make sure your Eureka Discovery Server is running. Otherwise, you will see many errors in the console.
Start the Spring Boot Web Service with the maven command.
mvn spring-boot:run
You can also pass command line arguments and override configuration properties at runtime if needed.
Preview Web Service in Eureka Discovery Server
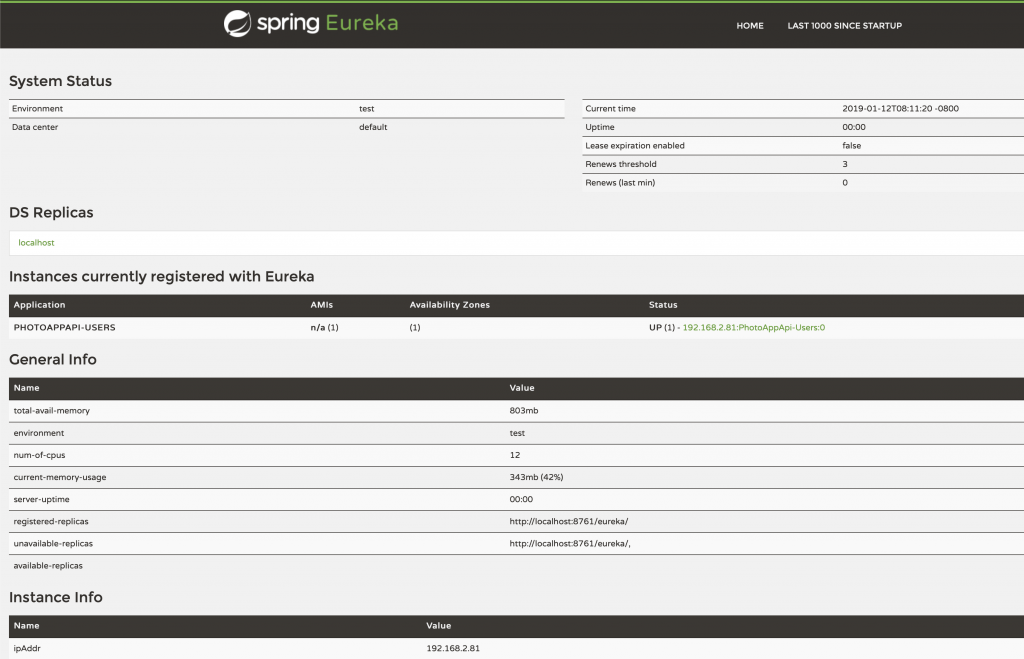
Now that we have both the Discovery Server and the Discovery Client started, we can check if our Microservice has successfully registered with the Discovery Server.
In our previous tutorial, we started the Discovery Server on port 8010. If we open the discovery server URL http://localhost:8010 in the browser window, we should see our web services registered there.

I hope this tutorial was helpful to you.
If you enjoy learning by watching a step by step video lessons, then check the below video courses that teach Spring Cloud. One of them might teach you things you do not know and make you feel much more confident as a developer of RESTful Web Services with Spring Boot and Spring Cloud.
Happy learning!