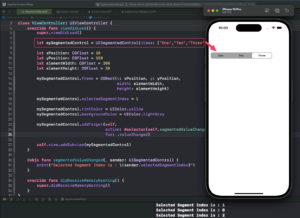
In this tutorial, you will learn how to create UISegmentedControl programmatically in Swift.
A UISegmentedControl is a horizontal control that consists of multiple segments, each segment functioning as a discrete button. You can use UISegmentedControl to create custom user interface elements for your app, such as a switch or a filter.
If you are interested in video lessons on how to write Unit tests and UI tests to test your Swift mobile app, check out this page: Unit Testing Swift Mobile App
Creating a UISegmentedControl programmatically in Swift involves several steps.
Here’s how you can do it:
Step 1: Creating a UISegmentedControl
The first step in creating a UISegmentedControl programmatically is to initialize it. You can do this within the viewDidLoad() method of your UIViewController. The UISegmentedControl requires an array of items that will represent the segments of the control. For instance, you could create a segmented control with three segments labelled “One”, “Two”, and “Three” like so:
let mySegmentedControl = UISegmentedControl(items: ["One","Two","Three"])
This creates a new UISegmentedControl with three segments, but it doesn’t yet appear on the screen because you haven’t added it to a view yet.
Step 2: Adding a UISegmentedControl as a Subview
To make the UISegmentedControl visible, you need to add it as a subview to your view. This is done by calling the addSubview(_:) method on your view and passing in the UISegmentedControl:
self.view.addSubview(mySegmentedControl)
However, just adding it as a subview won’t position it correctly on the screen. To do this, you need to set the frame property of the UISegmentedControl, which defines its size and position:
let xPosition: CGFloat = 10
let yPosition: CGFloat = 150
let elementWidth: CGFloat = 300
let elementHeight: CGFloat = 30

mySegmentedControl.frame = CGRect(x: xPosition, y: yPosition, width: elementWidth, height: elementHeight)
In this example, the UISegmentedControl will be positioned 10 points from the left edge of the screen and 150 points down from the top. Its width will be 300 points, and its height will be 30 points.
Step 3: Handle Value Changes
To respond to user interaction with the UISegmentedControl, you can add a target-action pair to it. The target is the object that will receive the action message, and the action is the method that will be called when the event occurs. In this case, you would add a method to your view controller that prints the index of the currently selected segment whenever it changes:
mySegmentedControl.addTarget(self, action: #selector(self.segmentedValueChanged(_:)), for: .valueChanged)

@objc func segmentedValueChanged(_ sender: UISegmentedControl) {
    print("Selected Segment Index is : \(sender.selectedSegmentIndex)")
}
Here, #selector(self.segmentedValueChanged(_:)) is a string that specifies the name of the method to be called, and .valueChanged is the type of event that triggers the action.
Step 4: Changing the Tint and Background Colour
You can change the appearance of the UISegmentedControl by modifying its tintColor and backgroundColor properties. The tintColor property sets the color of the text and selected segment, while the backgroundColor property sets the color of the unselected segments:
mySegmentedControl.tintColor = UIColor.yellow
mySegmentedControl.backgroundColor = UIColor.lightGray
In this example, the text and selected segment will be yellow, and the unselected segments will be black.
UISegmentedControl Complete Code Example
Below is a complete code example that creates UISegmentedControl in Swift programmatically. It uses all the above code snippets together.
import UIKit

class ViewController: UIViewController {
    override func viewDidLoad() {
        super.viewDidLoad()

        let mySegmentedControl = UISegmentedControl(items: ["One","Two","Three"])

        let xPosition: CGFloat = 10
        let yPosition: CGFloat = 150
        let elementWidth: CGFloat = 300
        let elementHeight: CGFloat = 30

        mySegmentedControl.frame = CGRect(x: xPosition, y: yPosition, width: elementWidth, height: elementHeight)

        mySegmentedControl.selectedSegmentIndex = 1

        mySegmentedControl.tintColor = UIColor.yellow
        mySegmentedControl.backgroundColor = UIColor.lightGray

        mySegmentedControl.addTarget(self, action: #selector(self.segmentedValueChanged(_:)), for: .valueChanged)

        self.view.addSubview(mySegmentedControl)
    }

    @objc func segmentedValueChanged(_ sender: UISegmentedControl) {
        print("Selected Segment Index is : \(sender.selectedSegmentIndex)")
    }

    override func didReceiveMemoryWarning() {
        super.didReceiveMemoryWarning()
    }
}

In this code, you create a UISegmentedControl with three segments labeled “One”, “Two”, and “Three”. You position the control 10 points from the left edge of the screen and 150 points down from the top. Its width is 300 points, and its height is 30 points.
The second segment is initially selected, the text color is yellow, and the background color is black. Whenever the selected segment changes, the index of the selected segment is printed to the console.
Conclusion
If you are interested in video lessons on how to write Unit tests and UI tests to test your Swift mobile app, check out this page: Unit Testing Swift Mobile App
I hope this tutorial was helpful to you. You now know how to create and customize UISegmentedControl programmatically.
To learn more about Swift and to find other code examples, check the following page: Swift Code Examples.